Wednesday, February 16, 2011
How to setup network in toshiba estudio
In order to set IP address, make sure printer kit/NIC is installed. Plugged network cable, Press Program button--> Initial Setup-->Network-->TCP/IP to configure IP address. Once finish, back to Network-->Complete to save the settings.
Tuesday, February 8, 2011
Media Player Firefox Plugin Windows Server 2003 / 2008
Media Player Firefox Plugin for Windows Server 2003 / 2008 is downloaded from
http://www.megaupload.com/?d=EH6IK54T
http://www.megaupload.com/?d=EH6IK54T
Sunday, January 23, 2011
Windows installer cannot be accessed
Reinstall the Windows Installer
To reinstall the Windows Installer, rename the damaged Windows Installer files, and then reinstall the Windows Installer. To do this, follow these steps:
1. Click Start, click Run, type cmd in the Open text box, and then click OK.
2. Type cd %windir%\system32, and then press ENTER.
3. Type attrib -r -s -h dllcache, and then press ENTER.
4. Type ren msi.dll msi.old, and then press ENTER.
5. Type ren msiexec.exe msiexec.old, and then press ENTER.
6. Type ren msihnd.dll msihnd.old, and then press ENTER.
7. Type exit, and then press ENTER.
8. At the command prompt, type exit, and then press ENTER.
9. Click Start, and then click Turn off computer or Shut Down.
10. Select the Restart option, and then click OK, or click Restart.
11. Log on to the computer.
12. Download and install the latest version of the Windows Installer. For more information about
how to obtain the Windows Installer, click the following article number to view the article in the Microsoft Knowledge Base:
893803 (http://support.microsoft.com/kb/893803/ ) Windows Installer 3.1 v2 (3.1.4000.2435) is available
13. Click Start, and then click Turn off computer or Shut Down.
14. Select the Restart option, and then click OK, or click Restart.
Log on to the computer.
Click Start, click Run, type msiexec /regserver in the Open text box, and then click OK.
Thanks Microsoft
Tuesday, January 4, 2011
Ms office 2003 sp3 slipstreaming
1. Insert the Office System (2003) CD into your drive, from the "Start" button select "Run" and type
d:\setup.exe /a
This is going to start the install process of Office 2003. You'll be presented with the option of where you want the files to go (I chose "C:\Office2003"), and you'll be asked to enter your CD key.
After entering the CD key, you'll be presented with the End User License Agreement. Accept it then continue.
It's going to appear to be installing, but in fact your files are being copied over to your hard drive.
The completion window will pop up and the entire Office 2003 CD is now copied to your hard drive.
2. Extract the Service Pack files
office2003SP3-KB923618-FullFile-ENU.exe /t:c:\Office2003SP3 /c
All the office2003Sp3 files are copied to c:\office2003sp3 folder
then
Start the "Run" command from your "Start" menu again. Enter the following command:
msiexec /p c:\Office2003SP3\MAINSP3.msp /a c:\Office2003\PRO11.MSI shortfilenames=true /qb
office sp3 is updated to folder c:\office2003.
office 2007 compatibility pack Deploying via Group Policy
First, download fileformatconverters.exe from Microsoft Website
create one blank directory name temp
then extract using the command
fileformatconverters.exe /extract:c:\temp\
Copy the files O12Conv.CAB and O12Conv.MSI to a shared folder on your server.
then goto the desired deploying ou and select group policy create new group policy.
Expand out the Computers Configuration and select the Software Settings > Software Installation.
Right-click in the right hand pane and select New > Package.
Browse to the package on the file share you are going to use and select the O12Conv.MSI
Once you have pressed OK you will find the package in your GPO.
Monday, October 18, 2010
How to Check Office 2010 Activation Status
1 Open an administrative level command prompt.
2 Change directory to the Office14 folder at the following location by typing the following command, and hit Enter to execute:
cd \Program Files\Microsoft Office\Office14
Note: For user installing 32-bit (x86) edition of Office 2010 on 64-bit (x64) Windows OS, type the following command instead, and hit Enter to execute:
cd \Program Files(x86)\Microsoft Office\Office14
3 Then, type the following command, and hit Enter to execute:
cscript ospp.vbs /dstatus
4 The LICENSE NAME and/or LICENSE DESCRIPTION gives the license type for Office 2010, while LICENSE STATUS shows activation status of Office 2010.
Wednesday, February 10, 2010
Install Office 2003 Service Pack 3 through GPO
Download Office SP3 (Office2003SP3-KB923618-FullFile-ENU.exe) from Microsoft.
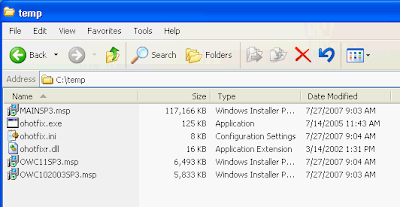
Create a temp folder for store extracted file on C:\temp. Extract the file to temp folder by run this command in the command line mode:
“Office2003SP3-KB923618-FullFile-ENU.exe /c /t:C:\temp /q”.
Now you can see the extracted files on temp folder. MAINSP3.msp is the main Office service pack 3. OWC11SP3.msp and OWC102003SP3.msp are web components service pack 3 for Office XP and Office 2003 respestively.
You can install Office Service Pack 3 by execute one of these commands below.
* Install with NO user interface. When it finishes install the service pack 3, the computer will be force to restart automatically.
“msiexec /p C:\temp\MAINSP3.msp /qn”
Command to install Office SP3 with restart after installation
* Install with NO user interface and force not to restart after finish install the service pack 3.
“msiexec /p C:\temp\MAINSP3.msp /qn /norestart”
Command to install Office SP3 with no restart after installation
If you have to install on many computers, you can put the command in the Group Policy Object (GPO) in logon script and also move the service pack files (.msp) to share folder so that the file can be executed by others.
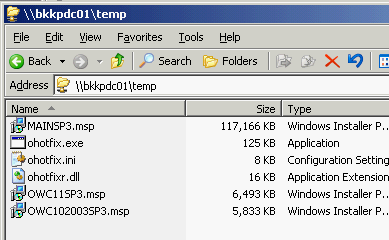
* For example, I move MAINSP3.msp to \\BKKPDC01\temp which is share folder.
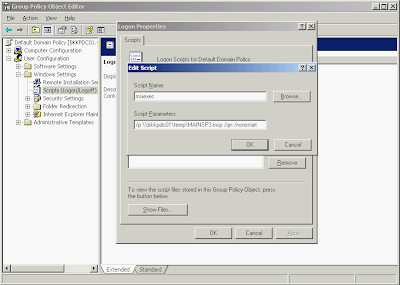
# Then I add logon script in Domain Group Policy with this command
Script Name: msiexec
Parameters: /p \\bkkpdc01\temp\MAINSP3.msp /np /norestart
to silent install Office SP3 silently with no restart after complete installation. Now when user logon to Windows with user on domain, the script will be executed automatically.
Note: This is only example If you need install this SP3 through GPO, you need to consider network performance issue. For instance, when many users are logon simulteneously, they also get the service pack file at the same time which can cause load on your network. You can solve this problem by not release this script to all users at the time.
Create a temp folder for store extracted file on C:\temp. Extract the file to temp folder by run this command in the command line mode:
“Office2003SP3-KB923618-FullFile-ENU.exe /c /t:C:\temp /q”.
Now you can see the extracted files on temp folder. MAINSP3.msp is the main Office service pack 3. OWC11SP3.msp and OWC102003SP3.msp are web components service pack 3 for Office XP and Office 2003 respestively.

You can install Office Service Pack 3 by execute one of these commands below.
* Install with NO user interface. When it finishes install the service pack 3, the computer will be force to restart automatically.
“msiexec /p C:\temp\MAINSP3.msp /qn”
Command to install Office SP3 with restart after installation
* Install with NO user interface and force not to restart after finish install the service pack 3.
“msiexec /p C:\temp\MAINSP3.msp /qn /norestart”
Command to install Office SP3 with no restart after installation
If you have to install on many computers, you can put the command in the Group Policy Object (GPO) in logon script and also move the service pack files (.msp) to share folder so that the file can be executed by others.
* For example, I move MAINSP3.msp to \\BKKPDC01\temp which is share folder.

# Then I add logon script in Domain Group Policy with this command
Script Name: msiexec
Parameters: /p \\bkkpdc01\temp\MAINSP3.msp /np /norestart
to silent install Office SP3 silently with no restart after complete installation. Now when user logon to Windows with user on domain, the script will be executed automatically.
Note: This is only example If you need install this SP3 through GPO, you need to consider network performance issue. For instance, when many users are logon simulteneously, they also get the service pack file at the same time which can cause load on your network. You can solve this problem by not release this script to all users at the time.

Subscribe to:
Posts (Atom)