The following describes the process of enabling the Internet Explorer
Content Advisor as a "white list" in a Group Policy Object (GPO) for Windows
XP PCs. Note: White list refers to blocking all internet access except for
selected sites (deny all, except).
1. Microsoft Active Directory (AD) does not have an option to simply
enable the Content Advisor. Instead, they use a model of importing settings
from the computer on which the AD Group Policy Object is being edited and
allowing you to configure those settings. So the first thing to do is to
enable the Content Advisor on the editing machine. If this is not done then
the Content Advisor configuration will be propagated out to the client
machines but the Content Advisor itself will not be enabled (turned on).
* Once the rest of this process has been completed, the Content
Advisor may be disabled on the editing machine with no effect to the clients
as just the importing of the settings is needed.
* Remember to enable the Content Advisor on the editing machine in
the future if changes are to be made to the Active Directory Group Policy
Object Content Advisor configuration to avoid inadvertently disabling the
Content Advisor on the target PCs.
1. Open IE and go to: Tools -> Internet Options
2. On the Content tab, under Content Advisor at the top, click the
button labeled "Enable". You will be prompted for the local machine Admin
password. Once this is done the button label changes to "Disable", thus
confirming that the Content Advisor has been turned on.
3. Click "OK" to exit Internet Options and close out of Internet
Explorer.
2. To make the "deny all", on BOTH the user PC and on the machine that
will be editing the Group Policy Object (again the importing) in
C:\WINDOWS\system32 create a text file named "noaccess.rat".
3. Use an editor to add the following:
((PICS-version 1.0)
(rating-system "http://www.microsoft.com")
(rating-service "http://www.microsoft.com")
(name "Noaccess")
(description "This file will block all sites.")
(category
(transmit-as "m")
(name "Yes")
(label
(name "Level 0: No Setting")
(description "No Setting")
(value 0) )
(label
(name "Level 1: No Setting")
(description "No Setting")
(value 1) ) ))
4. Save and Exit.
5. Open Group Policy Management (editing machine).
6. Locate the GPO in which you want to enable the Content Advisor.
7. Right click the object and select "Edit...".
8. In the now opened Group Policy Object Editor go to: User Configuration
-> Windows Settings -> Internet Explorer Maintenance -> Security
9. Double click on "Security Zones and Content Ratings"
10. Under "Content Ratings" click the radio button labeled "Import the
current Content Ratings settings" (the aforementioned importing step).
11. Click the button labeled "Modify Settings".
12. Enter the supervisor password and click "OK".
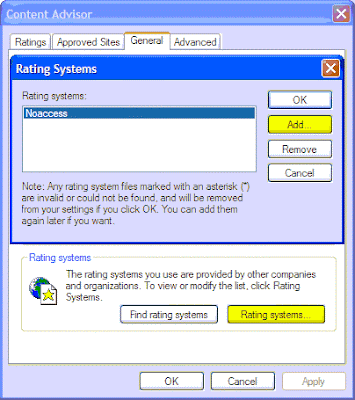
13. On the Ratings tab select the Noaccess category (this is the file that
was created earlier).
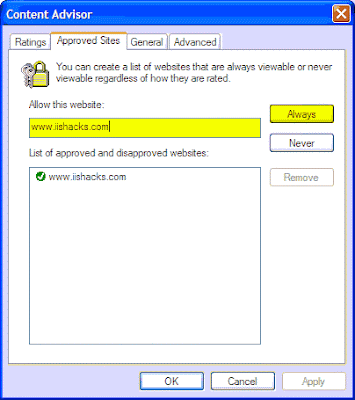
14. On the Approved Sites tab enter the list of approved sites, one at a
time, while selecting "Always" as "Never" was taken care of with the
noaccess.rat file.
* The wildcard * (asterisk) can be used to denote pages in a site
(eg.
http://www.case.edu* for all of
http://www.case.edu)
* Supposedly, the Content Advisor treats http requests as simply
www (eg.
http://www.case.edu is treated as
www.case.edu) but it's probably a
good idea to be as specific as possible to avoid confusion. Especially when
secure http (https) is a possibility.
* It may be a good idea to include the default homepage as
Internet Explorer may throw an error if the default homepage is content
restricted. This can be set with the Group Policy Object Editor. Go to: User
Configuration -> Windows Settings -> Internet Explorer Maintenance -> URLs.
Double click "Important URLs" and then check the box labled "Customize Home
page URL" and enter the desired site (eg.
http://www.case.edu or about:blank
for a blank page).
15. On the General tab uncheck the box under User options labeled "Users
can see websites that have no rating".
* The other option is up to you as to whether to allow for an
Admin override prompt when blocked content is encountered.
16. On the Advanced tab remove any ratings bureaus.
17. Click OK twice and exit out of the Group Policy Object Editor
18. For the policy to take effect on a user's PC, the best thing to do
would be to simply reboot the PC. You can also type "gpupdate /Force" at the
command line with Admin privileges.
* The PC has to be in the Organizational Unit (OU) to which the
GPO applies.
19. Don't forget to test BEFORE deployment. Even after. And later on...
----
If you’re using IE7, please try to install the following hotfix.
The Internet Explorer Maintenance Group Policy settings for the Content Advisor do not work on client computers that have Internet Explorer 7 installed
http://support.microsoft.com/kb/950065
Also, to block website, it’s suggested to use other policy or method, such as Proxy, Firewall settings to block them completely. They are better choice than Content Advisor for this purpose.

