1 Open an administrative level command prompt.
2 Change directory to the Office14 folder at the following location by typing the following command, and hit Enter to execute:
cd \Program Files\Microsoft Office\Office14
Note: For user installing 32-bit (x86) edition of Office 2010 on 64-bit (x64) Windows OS, type the following command instead, and hit Enter to execute:
cd \Program Files(x86)\Microsoft Office\Office14
3 Then, type the following command, and hit Enter to execute:
cscript ospp.vbs /dstatus
4 The LICENSE NAME and/or LICENSE DESCRIPTION gives the license type for Office 2010, while LICENSE STATUS shows activation status of Office 2010.
Monday, October 18, 2010

Wednesday, February 10, 2010
Install Office 2003 Service Pack 3 through GPO
Download Office SP3 (Office2003SP3-KB923618-FullFile-ENU.exe) from Microsoft.
Create a temp folder for store extracted file on C:\temp. Extract the file to temp folder by run this command in the command line mode:
“Office2003SP3-KB923618-FullFile-ENU.exe /c /t:C:\temp /q”.
Now you can see the extracted files on temp folder. MAINSP3.msp is the main Office service pack 3. OWC11SP3.msp and OWC102003SP3.msp are web components service pack 3 for Office XP and Office 2003 respestively.
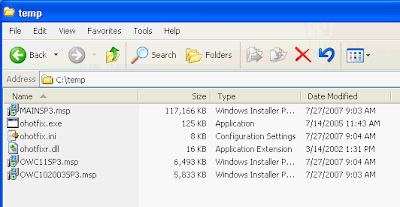
You can install Office Service Pack 3 by execute one of these commands below.
* Install with NO user interface. When it finishes install the service pack 3, the computer will be force to restart automatically.
“msiexec /p C:\temp\MAINSP3.msp /qn”
Command to install Office SP3 with restart after installation
* Install with NO user interface and force not to restart after finish install the service pack 3.
“msiexec /p C:\temp\MAINSP3.msp /qn /norestart”
Command to install Office SP3 with no restart after installation
If you have to install on many computers, you can put the command in the Group Policy Object (GPO) in logon script and also move the service pack files (.msp) to share folder so that the file can be executed by others.
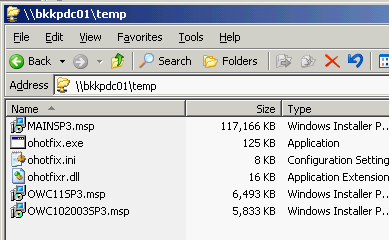
* For example, I move MAINSP3.msp to \\BKKPDC01\temp which is share folder.
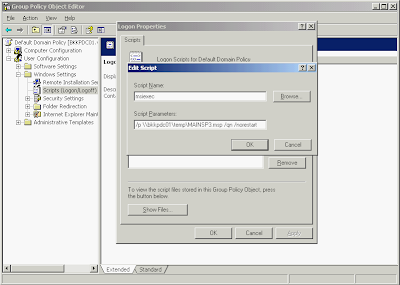
# Then I add logon script in Domain Group Policy with this command
Script Name: msiexec
Parameters: /p \\bkkpdc01\temp\MAINSP3.msp /np /norestart
to silent install Office SP3 silently with no restart after complete installation. Now when user logon to Windows with user on domain, the script will be executed automatically.
Note: This is only example If you need install this SP3 through GPO, you need to consider network performance issue. For instance, when many users are logon simulteneously, they also get the service pack file at the same time which can cause load on your network. You can solve this problem by not release this script to all users at the time.
Create a temp folder for store extracted file on C:\temp. Extract the file to temp folder by run this command in the command line mode:
“Office2003SP3-KB923618-FullFile-ENU.exe /c /t:C:\temp /q”.
Now you can see the extracted files on temp folder. MAINSP3.msp is the main Office service pack 3. OWC11SP3.msp and OWC102003SP3.msp are web components service pack 3 for Office XP and Office 2003 respestively.

You can install Office Service Pack 3 by execute one of these commands below.
* Install with NO user interface. When it finishes install the service pack 3, the computer will be force to restart automatically.
“msiexec /p C:\temp\MAINSP3.msp /qn”
Command to install Office SP3 with restart after installation
* Install with NO user interface and force not to restart after finish install the service pack 3.
“msiexec /p C:\temp\MAINSP3.msp /qn /norestart”
Command to install Office SP3 with no restart after installation
If you have to install on many computers, you can put the command in the Group Policy Object (GPO) in logon script and also move the service pack files (.msp) to share folder so that the file can be executed by others.
* For example, I move MAINSP3.msp to \\BKKPDC01\temp which is share folder.

# Then I add logon script in Domain Group Policy with this command
Script Name: msiexec
Parameters: /p \\bkkpdc01\temp\MAINSP3.msp /np /norestart
to silent install Office SP3 silently with no restart after complete installation. Now when user logon to Windows with user on domain, the script will be executed automatically.
Note: This is only example If you need install this SP3 through GPO, you need to consider network performance issue. For instance, when many users are logon simulteneously, they also get the service pack file at the same time which can cause load on your network. You can solve this problem by not release this script to all users at the time.

Thursday, January 7, 2010
Use Group Policy to disable USB, CD-ROM, Floppy Disk
Import this administrative template into Group Policy as a .adm file.
CLASS MACHINE
CATEGORY !!category
CATEGORY !!categoryname
POLICY !!policynameusb
KEYNAME "SYSTEM\CurrentControlSet\Services\USBSTOR"
EXPLAIN !!explaintextusb
PART !!labeltextusb DROPDOWNLIST REQUIRED
VALUENAME "Start"
ITEMLIST
NAME !!Disabled VALUE NUMERIC 3 DEFAULT
NAME !!Enabled VALUE NUMERIC 4
END ITEMLIST
END PART
END POLICY
POLICY !!policynamecd
KEYNAME "SYSTEM\CurrentControlSet\Services\Cdrom"
EXPLAIN !!explaintextcd
PART !!labeltextcd DROPDOWNLIST REQUIRED
VALUENAME "Start"
ITEMLIST
NAME !!Disabled VALUE NUMERIC 1 DEFAULT
NAME !!Enabled VALUE NUMERIC 4
END ITEMLIST
END PART
END POLICY
POLICY !!policynameflpy
KEYNAME "SYSTEM\CurrentControlSet\Services\Flpydisk"
EXPLAIN !!explaintextflpy
PART !!labeltextflpy DROPDOWNLIST REQUIRED
VALUENAME "Start"
ITEMLIST
NAME !!Disabled VALUE NUMERIC 3 DEFAULT
NAME !!Enabled VALUE NUMERIC 4
END ITEMLIST
END PART
END POLICY
POLICY !!policynamels120
KEYNAME "SYSTEM\CurrentControlSet\Services\Sfloppy"
EXPLAIN !!explaintextls120
PART !!labeltextls120 DROPDOWNLIST REQUIRED
VALUENAME "Start"
ITEMLIST
NAME !!Disabled VALUE NUMERIC 3 DEFAULT
NAME !!Enabled VALUE NUMERIC 4
END ITEMLIST
END PART
END POLICY
END CATEGORY
END CATEGORY
[strings]
category="Custom Policy Settings"
categoryname="Restrict Drives"
policynameusb="Disable USB"
policynamecd="Disable CD-ROM"
policynameflpy="Disable Floppy"
policynamels120="Disable High Capacity Floppy"
explaintextusb="Disables the computers USB ports by disabling the usbstor.sys driver"
explaintextcd="Disables the computers CD-ROM Drive by disabling the cdrom.sys driver"
explaintextflpy="Disables the computers Floppy Drive by disabling the flpydisk.sys driver"
explaintextls120="Disables the computers High Capacity Floppy Drive by disabling the sfloppy.sys driver"
labeltextusb="Disable USB Ports"
labeltextcd="Disable CD-ROM Drive"
labeltextflpy="Disable Floppy Drive"
labeltextls120="Disable High Capacity Floppy Drive"
Enabled="Enabled"
Disabled="Disabled"
Thanks Microsoft
CLASS MACHINE
CATEGORY !!category
CATEGORY !!categoryname
POLICY !!policynameusb
KEYNAME "SYSTEM\CurrentControlSet\Services\USBSTOR"
EXPLAIN !!explaintextusb
PART !!labeltextusb DROPDOWNLIST REQUIRED
VALUENAME "Start"
ITEMLIST
NAME !!Disabled VALUE NUMERIC 3 DEFAULT
NAME !!Enabled VALUE NUMERIC 4
END ITEMLIST
END PART
END POLICY
POLICY !!policynamecd
KEYNAME "SYSTEM\CurrentControlSet\Services\Cdrom"
EXPLAIN !!explaintextcd
PART !!labeltextcd DROPDOWNLIST REQUIRED
VALUENAME "Start"
ITEMLIST
NAME !!Disabled VALUE NUMERIC 1 DEFAULT
NAME !!Enabled VALUE NUMERIC 4
END ITEMLIST
END PART
END POLICY
POLICY !!policynameflpy
KEYNAME "SYSTEM\CurrentControlSet\Services\Flpydisk"
EXPLAIN !!explaintextflpy
PART !!labeltextflpy DROPDOWNLIST REQUIRED
VALUENAME "Start"
ITEMLIST
NAME !!Disabled VALUE NUMERIC 3 DEFAULT
NAME !!Enabled VALUE NUMERIC 4
END ITEMLIST
END PART
END POLICY
POLICY !!policynamels120
KEYNAME "SYSTEM\CurrentControlSet\Services\Sfloppy"
EXPLAIN !!explaintextls120
PART !!labeltextls120 DROPDOWNLIST REQUIRED
VALUENAME "Start"
ITEMLIST
NAME !!Disabled VALUE NUMERIC 3 DEFAULT
NAME !!Enabled VALUE NUMERIC 4
END ITEMLIST
END PART
END POLICY
END CATEGORY
END CATEGORY
[strings]
category="Custom Policy Settings"
categoryname="Restrict Drives"
policynameusb="Disable USB"
policynamecd="Disable CD-ROM"
policynameflpy="Disable Floppy"
policynamels120="Disable High Capacity Floppy"
explaintextusb="Disables the computers USB ports by disabling the usbstor.sys driver"
explaintextcd="Disables the computers CD-ROM Drive by disabling the cdrom.sys driver"
explaintextflpy="Disables the computers Floppy Drive by disabling the flpydisk.sys driver"
explaintextls120="Disables the computers High Capacity Floppy Drive by disabling the sfloppy.sys driver"
labeltextusb="Disable USB Ports"
labeltextcd="Disable CD-ROM Drive"
labeltextflpy="Disable Floppy Drive"
labeltextls120="Disable High Capacity Floppy Drive"
Enabled="Enabled"
Disabled="Disabled"
Thanks Microsoft
Wednesday, December 16, 2009
Restore Icons to the Desktop
In Microsoft Windows XP Home Edition and Professional, the new Start menu is enabled by default. When the new Start menu is enabled, the My Computer, My Documents, and My Network Places icons are removed from the desktop. To restore these icons, follow these steps:
1. Right-click the desktop and click Properties.
2. Click the Desktop tab.
3. Click Customize desktop.
4. Click the General tab, and then click the icons that you want to place on the desktop.
5. Click OK.
Thanks Microsoft.
1. Right-click the desktop and click Properties.
2. Click the Desktop tab.
3. Click Customize desktop.
4. Click the General tab, and then click the icons that you want to place on the desktop.
5. Click OK.
Thanks Microsoft.
Sunday, December 13, 2009
How to set path using bat file
Type the below command in notepad and save the file to .bat file extenstion.
cmd /k "set path=%path%;"c:\Program Files\Java\jdk1.5.0\bin"&&z:"
cmd /k "set path=%path%;"c:\Program Files\Java\jdk1.5.0\bin"&&z:"
Tuesday, December 8, 2009
Time synchronization between server and client
The following command is used for time synchronization between server and client.
This command is used in client computer.
w32tm /resync /computer:computername or domainname /nowait /soft
This command is used in client computer.
w32tm /resync /computer:computername or domainname /nowait /soft
Tuesday, December 1, 2009
avoid anonymous connections using Group Policy Objects
 To protect your Windows XP and Server 2003 computers, go to the same node within a GPO, but configure the following GPO settings: Microsoft has relied on anonymous connections to allow computers and services to establish open communications with other computers. These anonymous connections are not secure, however. Attackers exploit anonymous connections left open on Windows computers to access essential security-related information. With Group Policy Objects (GPOs), you can protect your Windows computers to restrict the anonymous connections.
What you are protecting
Once an attacker has made an anonymous connection to your computer, gaining access to much of the security-related information is easy. An attacker can gather the following information with an anonymous connection:
- List of users from your computer, including Active Directory
- List of groups from your computer, including Active Directory
- Security identifiers (SIDs) for user accounts
- User accounts for SIDs
- List of shares from your computer
- Account policies from your computer
- NetBIOS name from your computer
- Domain name associated with your computer
- List of domains that your domain trusts
Protection-level updates are here
To protect against anonymous connections and enumeration of essential security information, you should use Group Policy Objects. Microsoft changed the level of protection for the Windows 2000 and Windows XP/2003 environments.
- Network access: Allow anonymous SID/Name translation. This protects against tools that can grab the SID based on a name or vice-versa. You should set this to "Disabled."
- Network access: Let Everyone permissions apply to anonymous users. This protects against an anonymous connection accessing all resources that the Everyone group is configured to access. You should set this to "Disabled."
- Network access: Do not allow anonymous enumeration of storage area management (SAM) accounts. This protects against enumerating the list of users and groups in the SAM directory (or Active Directory). You should set this to "Enabled."
- Network access: Do not allow anonymous enumeration of SAM accounts and shares. This protects against listing users and groups from the SAM directory, as well as the list of shares for the computer. You should set this to "Enabled."
Subscribe to:
Posts (Atom)